Writing your own CUPS printer driver in 100 lines of Python
In version 1.8 of pretix, we introduced shipping management as a new feature for the pretix Hosted and Enterprise editions. With this plug-in, you can choose not to deliver your tickets to your visitors as a downloadable file, but to send them via snail mail instead. Of course, you can just download those tickets as regular-sized PDF files, print them out and ship them, but the feature is usually most interesting if you want to send out high-quality tickets that look good e.g. in a gift wrapping under a christmas tree or pinned to a wall as a souvenier of the event.
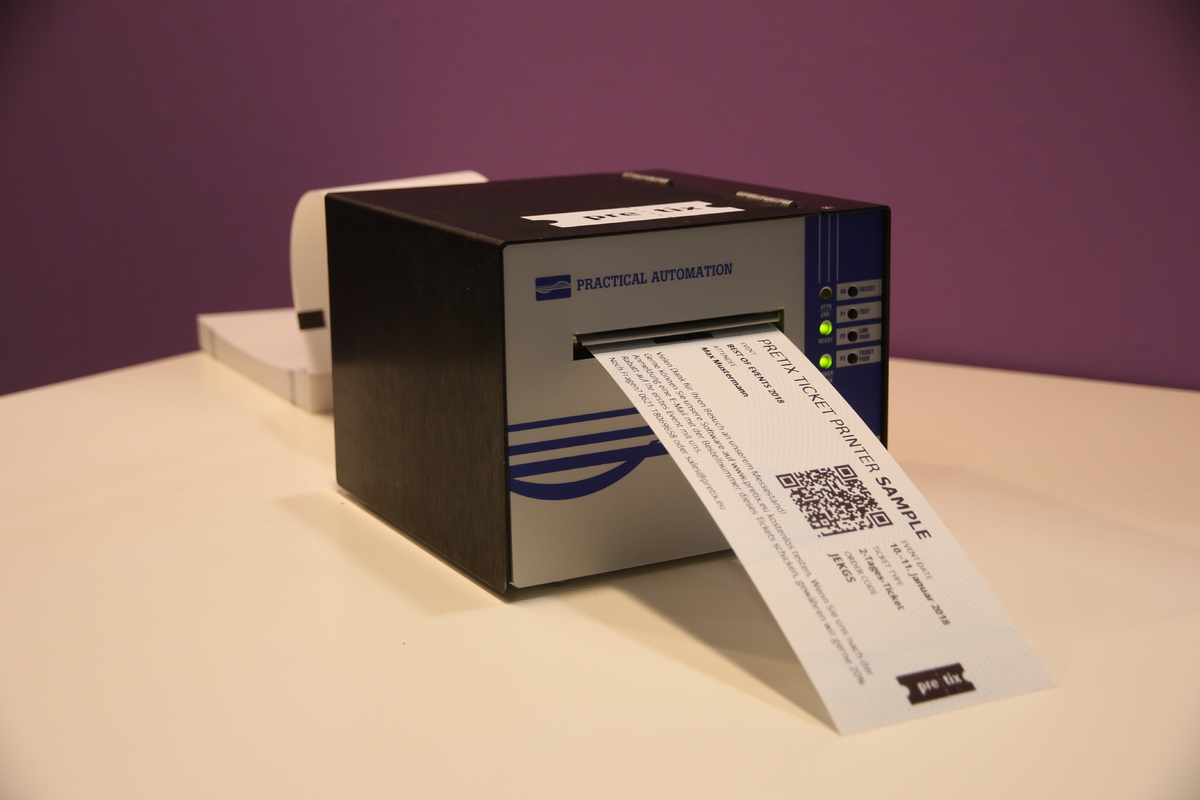
For this purpose, you will need a thermal ticket printer as well as suitable ticket paper. Last year, I took a closer look at this market and tested devices from two of the major ticket printer vendors: The BOCA Lemur as well as the Practical Automation uITL+2003CF model. In our test, the printing quality of both printers was very similar. The uITL+ is missing a network port in contrast to the BOCA Lemur, but the uITL+ features a nicer case (smaller and metal instead of plastic) and is way more affordable to obtain, at least here in Europe.
For this reason, we chose the uITL+ as our reference printer and for our first customer installation. You’ve already seen a photo of the uITL+ in our last blogpost:
However, there is another downside to the uITL+: It only comes with a Windows driver, while the BOCA printers come with drivers for all platforms, including packages for Debian, Ubuntu, Fedora, CentOS, Arch Linux, FreeBSD, and even an ARM build for the Raspberry Pi.
Both printers speak FGL (“Friendly Ghost Language”) over the wire, a communication protocol common to the world of ticketing printers. With FGL, you can send ASCII text and style information in order to render your tickets directly on the printer (but we want to send PDFs rendered on the server instead, which is why we need a driver to convert). Documentations of FGL can be obtained via the websites of both vendors. This also means that the drivers are, in theory, cross-compatible with minimal adjustments in configuration. However, the license of the BOCA driver forbids using their driver to control printers of other vendors. Additionally, no sources of the driver are available and some builds (like the ARM build of the Raspberry Pi package) only run on very old operating systems since they link to very old library versions.
Therefore, to use the uITL+ from a Linux operating system, we need to roll our own driver.
Printing on unix-like operating systems like Linux or macOS is usually done through the CUPS daemon. CUPS is responsible for handling printer configuration, scheduling print jobs and actually talking to the printer over the wire. Unfortunately, though, CUPS does not speak FGL out of the box.
If we look into CUPS’ documentation on driver development, we see that we basically need to work on two tasks:
-
We need to write a filter program that takes rastered pixel data as an input and outputs FGL code.
-
We need to generate a PPD file that contains configuration information about the printer (i.e. name, name of the newly created filter, paper sizes, cutter settings).
Writing a CUPS filter
Let’s get started with writing our CUPS filter, which we will call rastertofgl. Usually, most CUPS filters are written
in C, but I decided to choose Python instead – not only because I know it better, but also because writing it in a compiled
language also means that we need to cross-compile it to different architectures like ARM if we want to run it on devices
like the Raspberry Pi, which creates additional effort. Basically, we can use any language because the filter just needs
to be an executable that reads a data stream on standard input and outputs a data stream on standard output.
The incoming data stream consists of pages of data in the CUPS Raster Format, version 3. Every page starts with a page header of fixed length containing meta information such as the color space, page size, orientation, etc. In order to be able to conveniently access this data later, let’s start by defining a namedtuple for storage. For brevity, I’m not including all the 104 properties here:
CupsRas3 = namedtuple(
    'CupsRas3',
    'MediaClass MediaColor MediaType OutputType AdvanceDistance '
    'AdvanceMedia Collate CutMedia Duplex HWResolutionH '
    'HWResolutionV ImagingBoundingBoxL ImagingBoundingBoxB '
    'ImagingBoundingBoxR ImagingBoundingBoxT InsertSheet Jog '
    'LeadingEdge MarginsL MarginsB ManualFeed MediaPosition'
    ...
)
Next, we make use of the struct module from Python’s standard library to read the magic word from the beginning and then split the binary stream into all its different components. From the header, we then know the width and height of the page in pixels as well as the number of bits per pixels, allowing us to read all of the page into a bytearray and then continuing with parsing the next page:
def read_ras3(rdata):
    if not rdata:
        raise ValueError('No data received')

    # Check for magic word (either big-endian or little-endian)
    magic = unpack('@4s', rdata[0:4])[0]
    if magic != b'RaS3' and magic != b'3SaR':
        raise ValueError("This is not in RaS3 format")
    rdata = rdata[4:]  # Strip magic word
    pages = []

    while rdata:  # Loop over all pages
        struct_data = unpack(
            '@64s 64s 64s 64s I I I I I II IIII I I I II I I I I '
            'I I I I II I I I I I I I I I I I I I I I I f ff ffff '
            'IIIIIIIIIIIIIIII ffffffffffffffff 64s 64s 64s 64s 64s'
            '64s 64s 64s 64s 64s 64s 64s 64s 64s 64s 64s 64s 64s '
            '64s',
            rdata[0:1796]
        )
        data = [
            # Strip trailing null-bytes of strings
            b.decode().rstrip('\x00') if isinstance(b, bytes) else b
            for b in struct_data
        ]
        header = CupsRas3._make(data)

        # Read image data of this page into a bytearray
        imgdata = rdata[
            1796:1796 + (
                header.cupsWidth * header.cupsHeight *
                header.cupsBitsPerPixel // 8
            )
        ]
        pages.append((header, imgdata))

        # Remove this page from the data stream,
        # continue with the next page
        rdata = rdata[
            1796 + (header.cupsWidth * header.cupsHeight *
                    header.cupsBitsPerPixel // 8):
        ]

    return pages
This allows us to read all the data we get from CUPS!
pages = read_ras3(sys.stdin.buffer.read())Now, we need to interpret this data as an image and then re-output it as FGL. Unfortunately, CUPS sends us grayscale values and our printer only supports pixels that are either fully black or white. Since we do not want to drop grayscale values compeltely, we want to apply Dither. Additionally, to make the conversion logic easier, we want to rotate the picture since we want to print the tickets in landscape mode (for now).
This makes it cumbersome with pure standard library features, so I decided that it is feasible to introduce Pillow as a dependency, since Pillow is also available from the package repositories of all major Linux distributions – and probably installed on your system already. Let’s go ahead and load the pixels into Pillow, then!
for i, datatuple in enumerate(pages):
    (header, imgdata) = datatuple

    if header.cupsColorSpace != 0 or header.cupsNumColors != 1:
        raise ValueError(
            'Invalid color space, only monocolor supported'
        )

    im = Image.new("L", (header.cupsWidth, header.cupsHeight))
    im = im.rotate(90)
    pixels = im.load()
    for j, b in enumerate(imgdata):
        pixels[j % header.cupsWidth, j // header.cupsWidth] = b
Pillow can automatically convert the picture to black and white for us, if we ask it to:
    im = im.convert('1')
    pixels = im.load()
If we want to send the raster data to the printer, we need to follow the FGL instructions for graphical data, which expects us to send 8 lines of pixels at a time: One byte for each column with each bit of the byte representing one of the 8 lines. We therefore loop over the image in blocks of 8 lines and create a row of bytes for each of these blocks. If any of these pixels is non-white, we’ll send the row to the printer, preceeded my a “move” command:
    for yoffset in range(0, im.height, 8):
        row = [0] * im.width
        for x in range(im.width):
            for j in range(8):
                if pixels[
                    min(x, im.width - 1),
                    min(yoffset + j, im.height - 1)
                ] < 128:
                    row[x] |= 1 << (7 - j)
        if any(row):
            # FGL: <RCy,x>: Move to correct position
            # FGL: <Gnn>: nn bytes of graphics are following
            sys.stdout.buffer.write('<RC{},{}><G{}>'.format(
                yoffset, 0, len(row)
            ).encode())
            sys.stdout.buffer.write(bytes(row))
Almost there! We now only need to send either “print” or a “print and cut” command, depending on the options of the print job (or the printer’s defautl options):
    if header.CutMedia in (1, 2, 3) and i == len(pages) - 1:
        # Cut after last ticket of file/job/set
        sys.stdout.buffer.write(b'<p>')
    elif header.CutMedia == 4:  # Cut after page
        sys.stdout.buffer.write(b'<p>')
    else:  # Do not cut
        sys.stdout.buffer.write(b'<q>')
We can now test that our filter is running correctly by obtaining a sample stream of CUPS raster data and piping it through our filter and directly into the printer:
# cat sample.raster | ./rastertofgl > /dev/usb/lp1
It works! To use this with cups, we now also need to write a PPD file.
PPD printer defintion
PPD is a nasty format that is no fun to write by hand. Luckily, CUPS comes with a tool named ppdc that allows us to write a slightly higher-level DRV file and then later compile it to a PPD. The full reference for DRV files can be found here. For our case we start with some boilerplate details like the printer’s name:
#include <font.defs>
#include <media.defs>
{
  Manufacturer "Practical Automation"
  ModelName "ITL-2003"
  PCFileName "paITL2003.ppd"
  Version 1.0
  Attribute "NickName" "" "Practical Automation ITL-2003"
Next, we define the name of the filter that we want to apply, which is the rastertofgl script we just wrote:
Filter "application/vnd.cups-raster 100 rastertofgl"
We also need to tell CUPS the DPI and the color model, in order to receive the correct number and type of pixels for our filter:
  *Resolution - 8 0 0 0 203dpi
  ColorModel Gray/Grayscale w chunky 0
We want to give the user the option to turn the printer’s cutter on or off – or choose whether the printer shall cut after every single ticket or just after every print job:
  Group "General/General"
    Option "fooCutMedia/Cut Labels" PickOne AnySetup 10,0
      Choice "Never/Never cut media" "<</CutMedia 0>>setpagedevice"
      *Choice "Job/Cut after job" "<</CutMedia 2>>setpagedevice"
      Choice "Page/Cut after every ticket" "<</CutMedia 4>>setpagedevice"
CUPS also has an integrated Cutter yes directive, but this only allows to turn the cutter on or off completely, while
we want to have all three options here.
  VariablePaperSize Yes
  HWMargins 0,00 0,00 0,00 0,00
  MinSize 0,00 0,00
  MaxSize 0,00 0,00
And then, finally, we need to specify all paper sizes that we want to support. We like tickets of the regular 8x3.25” size best, but our PPD file includes 55 other different paper sizes as well. Here’s just one example of how this looks:
CustomMedia "ticket8x3.25/Ticket 8x3.25in" 576,00 234,00 1,00 2,00 0,00 0,00 "<</PageSize[576 234]/ImagingBBox null>>setpagedevice" "<</PageSize[576 234]/ImagingBBox null>>setpagedevice"
Final remarks
Half a day, 100 lines of python, and 69 test tickets printed later, we’re done! We just need to place the filter and the PPD files in the correct places and our printer driver will be available to use. To make it easier for you, I created packages for Arch Linux and Debian. All source code of the driver can be found on GitHub, of course.
Some issues remain, for example our filter currently fails for unclear reasons whenever I want to print a PDF from a GTK-based
PDF viewer – printing the same file with lpr from the command line works fine.
If you are interested in printing and shipping tickets, make sure to check out pretix’ Shipping feature and automated printing tool! You can also buy your ticket printer and paper from us for a competitive price – just drop a line at sales@pretix.eu for more information.